Wednesday, January 30, 2013

Lavender-Basil Soap

For the past couple years I have hydroponically grown basil indoors during the winter months. 


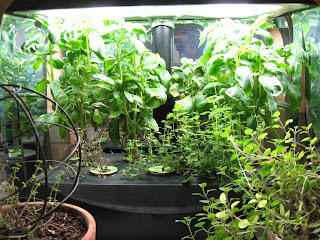
I bake with it, put it in sandwiches, add it to omelets, and give plenty away. 

It is one of the easiest Herbs to grow indoors.

The one thing I never thought of using it for is SOAP! Not until I ran across Suzanne McMinn's blog, 'Chickens in the Road' ,did I have a 'Daaaaaa' moment! Why not Basil in soaps.....I have plenty of it!

So, that is where I am doing today! 

For my Lavender Basil Soap I used:

Coconut Oil
Cottonseed Oil
Olive Oil
Soybean Oil
Sunflower Oil
and 
Lard
&
Lavender Essential Oil

I also wanted to put some color into this soap.
I infused the Sunflower Oil with some dried, crushed Basil and Kelp Powder. 
 (color of the oils)
I wanted a nice green color, but you never know the exact color it will end up to be  until it goes through the gel stage. 
I left the Kelp power and the crushed Basil leaves in the soap
for a specked look.

I put some Titanium Dioxide in some of the batter to get a whiter
color for the top of the soap.


Here is what it looks like before I cut it.
This is what it looked like cut.
 

As you can see, the green went to a very pale green.

ValerieAnn

Tuesday, January 8, 2013

Homemade Lip Balm Recipe

Home made lip balm is pretty easy to make.

With this formula in mind you can create your own recipe.

Use:


40% liquid oil such as Olive Oil and Almond Oil
25% solid oil such as Coconut Oil, Palm, and Shea Butter
20% Beeswax
15% Cocoa Butter, Illipe Butter, Palm Kernel Oil.

If you want to put flavored oil in your recipe you use about 3-4 % of flavoring to your whole recipe.


You can make any size recipe you want.

Here is a simple recipe:

1.6 oz avocado oil
1 oz coconut oil
.8 oz beeswax
.6 oz cocoa butter
1/2 tsp flavored oil

Weigh all the ingredients ( including flavor oil) and melt in an microwave safe bowl on short burst.


Oils heat up fast so just heat 10-25 or 30 seconds at a time.
Because Beeswax melts at about 150 degrees, stir often in between heating. When there is only a few pieces of wax left to melt, stirring alone may be all it takes to melt the last little bit of wax.
                                                     Or
You can also melt the oils in a pan on very low heat or in a double boiler.
This will take more time, but to me it is worth the wait.

After the balm is heated it will be very, very hot, so be careful as you fill your containers.

      You can use a 'mini pot' or lip balm tubes for your finished product.


          To fill the tubes you will need a plastic dropper or a 'Pipette' (dropper). 

I bought some Pipette's on MMS.com. They are pretty inexpensive, and great to have around.

While filling the tubes I keep the pan on the heat  because the  oils cool down rather quickly, and the dropper can get clogged. Keeping the balm hot helps prevent this.


A glass dropper will cool the balm down fast also, so keep that in mind.

You can get lip balm tubes just about anywhere on line. I got mine, plus some shrink wraps to go with them, off of eBay.


You can use your hair dryer on high to shrink the wraps on the tubes, or you can use a heat gun.
                                               
I use Avery labels & their free label designer & printer on their web site.
Putting a label on your tubes gives it a nice professional look to you finished product if you are going to sell them, or to give them as gift.


For more lip balm recipes go to MMS.

Enjoy!
ValerieAnn


Monday, January 7, 2013

Making your own tallow & Soap Recipe


Sometimes I have this insatiable desire to experience what our pioneer woman before us had to do out of necessity, and not out of desire!

Soap making was one of them!

After learning, and making my first bars of soap, I wanted the 'whole' experience of making soap, which to me meant: making soap out of Tallow.

I did not know where to buy Tallow, so I had to learn how to make my own. Through reading on the subject I discovered how.

Making your own tallow is not only 'not hard' it is very satisfying! If you do not have the time there are places such as EssentialDepot.com that sells all ready rendered beef fat.

If you have the time and the desire to make Tallow....then dig right in and  follow along as I give instructions.

The ingredients:


*5 lb of beef FAT (or less if you so desire)
*water

If you can get the butcher to grind the fat it will be better. 
-ground beef fat-


Place the fat in a large pot ad melt slowly, avoiding burning the un-melted fat. Continue to heat for 30-60 minutes, cool slightly for safety, and carefully decant over a sieve to remove cooked meat particles.


Melting beef fat


Add 1/2 volume of clean water to cooled melted fat.


 Heat up water and fats again and cover and reduce heat to continue a low boil for 4 hours. Most of the water will evaporate and the impurities of the fat will go to the bottom.

Cool slightly and pour fat/water gently and carefully into a large plastic or ceramic bowl. I use a large plastic bowl myself. Place this bowl into the refrigerator to cool over night.

The next day turn your bowl upside down on a platter, over or near a sink. There will be two to three layers that will have formed. One: a protein laden jelly type water on the bottom,

 and a fat/water grainy suspension layer in the middle, and a disk of pure tallow on the top. (this layer will be on the bottom when turned over)
Pick up and rinse the jelly protein off and pat dry. 

You have just tendered and made pure Tallow!

How much tallow you will have depends on how much beef fat you have rendered. For example: If you render 2 lbs of beef fat...you will get 1 lb of tallow.


Although this was not the first recipe I made with tallow, is was one I made for a local Museum's store that carried 'old time' crafts. (I cut the recipe down for the sake of putting it here, because it was a very large batch I made for the museum)

HOMESTEADERS SOAP

32 oz Tallow
12 oz water
4.2 oz sodium hydroxide
2.5 oz fragrance of your choice

Add sodium hydroxide to water under a fan, or in a well ventilated area.
Stir until all the sodium hydroxide is dissolved. Set aside.

Melt Tallow.

When Lye water and Tallow are about the same temperature, 125-130 degrees, pour lye water slowly into Tallow. Stir until blended, then use a stick blender until it comes to trace. 

Add fragrance oil, and blend well. Pour into a mold of your choice.


Cover and let it sit for 24 hrs. Cut into bars and cure 3-4 weeks. 


* Tallow produces a very hard bar of soap that is mild to the skin, but only produces a small creamy lather. 

Have a great Monday!

ValerieAnn

Saturday, January 5, 2013

All Natural Homemade Lotion Bars Recipe


Need something to soften those dry hands that have spent too much time cleaning and exposure to water?
Do your fingers crack and bleed?
Or....do you need a fast and wonderful gift for a friend.....or foe?
Lotion bars are a great for all of the above!

Lotion bars are very easy and fast to make.
By using a few ingredients you can have a wonderful bar of lotion that you can take anywhere, and use anytime, or give away!

Just by following a simple basic ingredients breakdown.

Use:  25-33% Beeswax
          67-75% base oils
  and Vitamin E Oil      (as a  preservative to keep oils from going rancid)

There are many, many different oils  you can use as a base oils, but for this recipe I just picked three.

5.5 oz beeswax
7 oz olive oil
6.5 oz coconut oil
1.5 oz Shea butter (I use unrefined Shea Butter)
1 scant tablespoon Vitamin E Oil
1 tablespoon fragrance oil ( you can use more or less)

Measure all ingredients, except the Shea Butter,  into a small pan.

Put the pan on the lowest setting on your stove and let all melt slowly. Beeswax melts at about 150 degrees, so you don't want the oils to heat up beyond that.

You can also use the microwave with a microwave safe bowl. But melt slowly, with 20-30 second burst, and stir in between burst. 

It doesn't take a lot of heat to heat up Olive and coconut oils. But because beeswax melts at about 150 degrees in between heating bursts stir to get the beeswax to melt before you put it in for another 20-30 seconds.  Towards the end it may only take about 10 seconds (or just more stirring) to melt the rest of the beeswax. 

There is no right or wrong way to melt this. Just as long as you do not let the oils get too hot. Having some kind of a thermometer will help you to keep an eye on the temperature. 

When all is melted let it stand for a few minutes to cool down to about 130-135 degrees, and then add the Shea Butter and let it melt on its own (or you can stir it around). If Shea Butter is heated on a too high of a temperature it could turn grainy. You don't want this to happen.

Pour into a mold of your choice. Don't let the mixture cool to much or it will start to solidify. If it does, just heat it back up a bit.

Here are three different tins you can put your finished lotion bars in.
The small square holds approximately a .9 oz square lotion bar.
I used the silicone brownie bite
mold to get this size.

 The other tins you can find on line at

Small round holds about 1.9 oz round bar of lotion.
You can get the mold I used for this size tin at:
http://www.brushymountainbeefarm.com/Molds/products/86/
384 Guest Bee Soap Mold

The large round is a 4 oz container. 
I used a Bee & Honey Comb mold for this one from:
Brambleberry.com  


You can use virtually anything to mold you lotion bars! Before you throw out or recycle anything....think....could I use this for lotions bars? or even a soap mold? You never know! I have also used an empty mineral powder jar! As long as it does not have a lip at the top that bends inside the jar...it should pop right out for you!

Enjoy!
ValerieAnn